
ПомощьHelp
За три шагаIn three steps
Получи ключ APIGet an API key
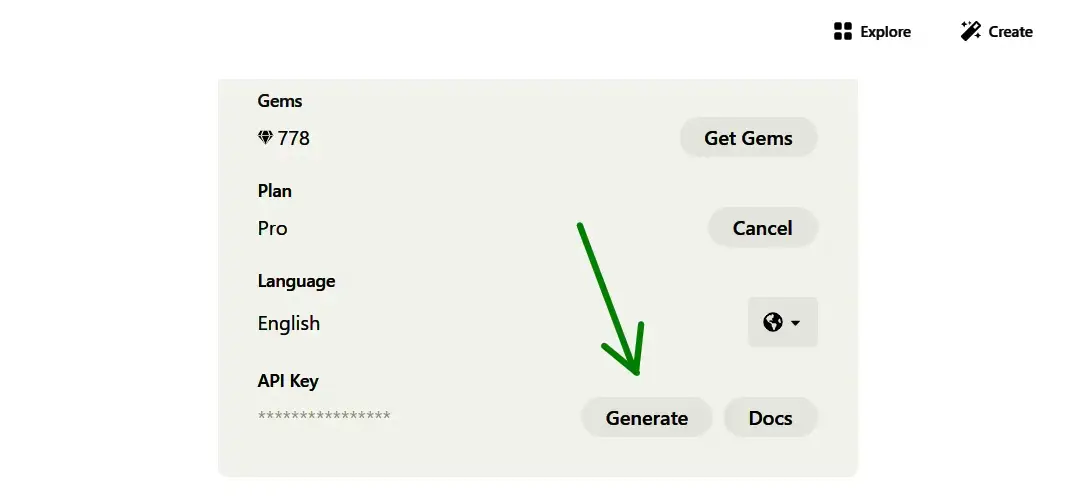
Gemini или OpenRouter — это бесплатно. как получитьGemini or OpenRouter — for free. how to get one
Вставь в НастройкиPaste into Settings
В игре: Настройки → модели API → вставь ключ.In game: Settings → API models → paste the key.
Готово — играй!Done — play!
Клик по персонажу — песочница, «Новая игра» — сюжет.Click a character — sandbox, or “New game” — story mode.
Сердце и мозг игрыThe heart and brain of the game
Без текстовой модели игру не пройти. API — это способ, которым игра «общается» с удалённой нейросетью через интернет по ключу. Как выбрать быстро: бесплатно начать — Gemini (есть лимит) или OpenRouter (бесплатные модели помечены free:); качество почти без цензуры — Claude; подешевле и для экспериментов — Grok. There’s no game without a text model. An API is how the game “talks” to a remote neural network over the internet using a key. How to choose fast: to start free — Gemini (has a limit) or OpenRouter (free models are marked free:); near-uncensored quality — Claude; cheaper and for experiments — Grok.




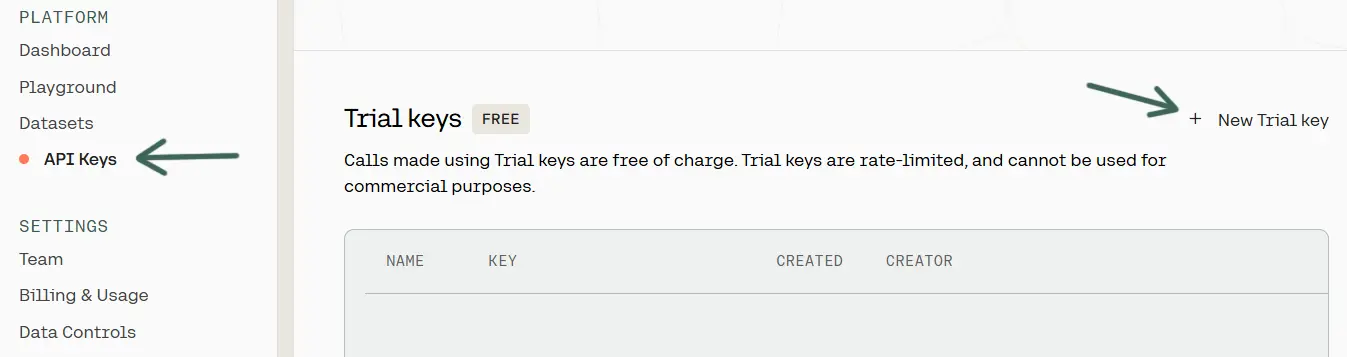
📋 Пошагово по каждому провайдеру📋 Step-by-step for each provider
Gemini. aistudio.google.com → Get API key → Create API key → скопируй в Настройки.aistudio.google.com → Get API key → Create API key → copy into Settings.
OpenRouter. openrouter.ai → Keys → Create Api Key → задай имя/лимит → скопируй.openrouter.ai → Keys → Create Api Key → set a name/limit → copy.
Claude (Anthropic). console.anthropic.com → API Keys → Create Key → пополни billing.console.anthropic.com → API Keys → Create Key → top up billing.
OpenAI. platform.openai.com → шестерёнка вверху справа → API keys → Create new secret key → пополни billing.platform.openai.com → gear top-right → API keys → Create new secret key → top up billing.
Grok (xAI). console.x.ai → API Keys → Create API key → Manage-Billing.console.x.ai → API Keys → Create API key → Manage-Billing.
Groq. console.groq.com → Keys → Create API Key → billing.console.groq.com → Keys → Create API Key → billing.
Cohere. dashboard.cohere.com → API Keys → Trial (бесплатно) или Production (+ billing).dashboard.cohere.com → API Keys → Trial (free) or Production (+ billing).
🔧 Нюансы получения ключей🔧 Getting keys — the fine print
Gemini. В странах, где Gemini заблокирован, нужен VPN (желательно США). Надёжнее завести Google-аккаунт с основным языком «американский английский». В настройках игры для Gemini можно вписать несколько ключей через запятую (не работает со встроенным прокси).In countries where Gemini is blocked you’ll need a VPN (US is best). It’s more reliable to use a Google account whose main language is American English. In the game you can enter several Gemini keys separated by commas (doesn’t work with the built-in proxy).
Платные модели (Claude, OpenAI, Grok, Groq, Cohere). После создания ключа пополни баланс во вкладке billing в кабинете провайдера — без баланса запросы не пойдут.After creating a key, top up your balance in the provider’s billing tab — requests won’t work without funds.
Кастомный endpoint. В настройках можно подключить любой OpenAI-совместимый API: укажи URL (только https), ключ (если нужен) и имя модели.Custom endpoint. In settings you can connect any OpenAI-compatible API: enter the URL (https only), the key (if needed) and the model name.
🧠 koboldcpp
Полностью офлайн и приватно — модель крутится на твоём железе, цензуры почти нет. В сборке win-local модель уже включена: в настройках выбери «koboldcpp» и модель. На macOS/Linux/win скачай GGUF-модель в resources/koboldcpp и выбери её. По умолчанию koboldcpp работает на порту 5001.
Fully offline and private — the model runs on your hardware with almost no censorship. The win-local build already bundles a model: pick “koboldcpp” and a model in settings. On macOS/Linux/win drop a GGUF model into resources/koboldcpp and select it. By default koboldcpp runs on port 5001.
скачать koboldcpp →download koboldcpp → GGUF-модели на huggingface →GGUF models on huggingface →
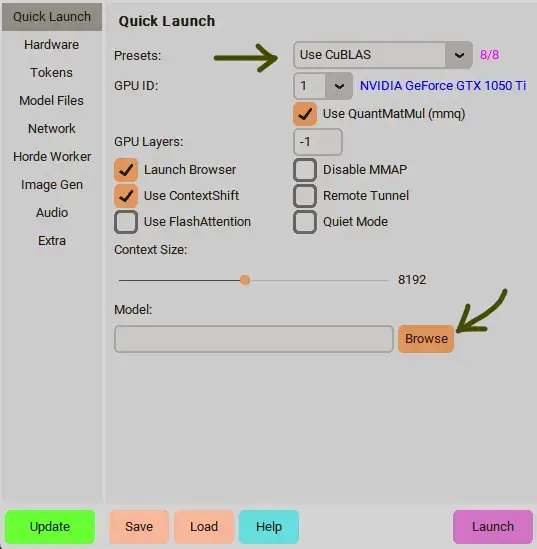
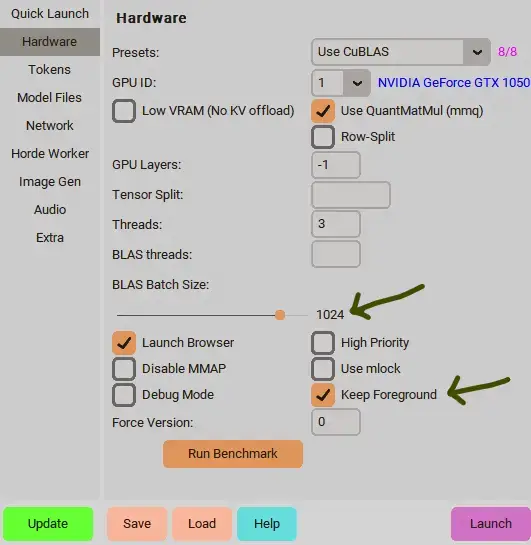
Запуск: koboldcpp → загрузи модель → запусти игру (выбери «koboldcpp»). В игре работает только порт 5001 (вкладка Network). Кнопка консоли в игре показывает логи koboldcpp. Режим для тех, кто понимает, что делает, или хочет тонко настроить GPU/CPU.
Launch: koboldcpp → load a model → start the game (pick “koboldcpp”). In the game only port 5001 works (Network tab). The in-game console button shows koboldcpp logs. It’s for those who know what they’re doing or want fine GPU/CPU control.
📱 koboldcpp-remote
Локально на смартфоне модель не запустить, но можно играть на телефоне в связке с мощным ПК — двумя способами: You can’t run a local model on a phone, but you can play on a phone paired with a powerful PC — in two ways:
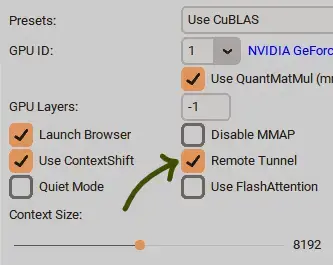
▪ Cloudflare (встроенный): запусти koboldcpp → включи Remote Tunnel → загрузи модель → на телефоне выбери «koboldcpp-remote» и вставь URL, который выдал кобольд. ▪ Cloudflare (built-in): launch koboldcpp → enable Remote Tunnel → load a model → on the phone pick “koboldcpp-remote” and paste the URL kobold gave you.
▪ ngrok: зарегайся на ngrok, скачай плагин (запакованный ngrok + прокси) → запусти start.bat и вставь токен → запусти koboldcpp с выключенным Remote Tunnel → на телефоне выбери «koboldcpp-remote» и вставь URL от ngrok.
▪ ngrok: sign up at ngrok, download the plugin (packed ngrok + proxy) → run start.bat and paste your token → run koboldcpp with Remote Tunnel off → on the phone pick “koboldcpp-remote” and paste the ngrok URL.

 Uncensored Local AI androidandroid
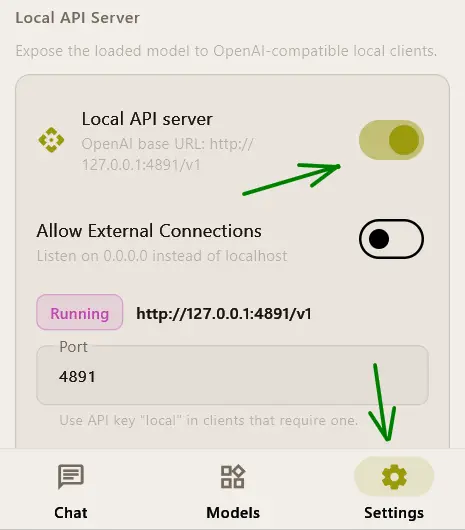
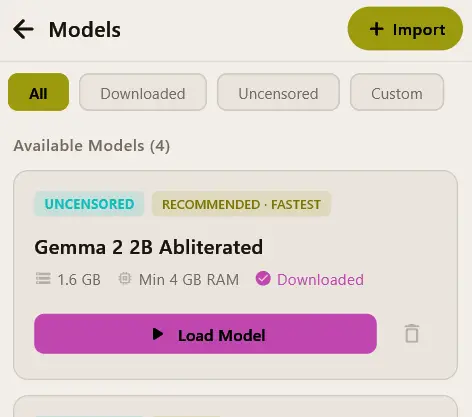
Локальная модель прямо на Android: установи приложение, загрузи GGUF-модель и включи local api server. В настройках игры выбери «uncensored local ai» и оставь поле endpoint пустым (по умолчанию 127.0.0.1:4891).
A local model right on Android: install the app, load a GGUF model and enable the local api server. In the game pick “uncensored local ai” and leave the endpoint field empty (defaults to 127.0.0.1:4891).
официальный репозиторий →official repo →
🗄 koboldai — устаревший вариант🗄 koboldai — the legacy option
Поддерживается, но не рекомендуется (koboldcpp удобнее). скачать для Windows · репозиторий и решение для Linux.Supported but not recommended (koboldcpp is easier). download for Windows · repo & Linux solution.
Запусти koboldai (local) → загрузи модель → выставь режим «чат» → запусти игру (выбери koboldai). Работает только на порту 5000.Launch koboldai (local) → load a model → set “chat” mode → start the game (pick koboldai). It only works on port 5000.
Проверка: после отправки сообщения из игры → в кобольде открой меню «память» — там должен подгрузиться системный контекст во всей красе.To verify: after sending a message from the game → open the “memory” menu in kobold — the system context should load there in all its glory.
Генерация изображенийImage generation
🎨 Stable Diffusion · ComfyUI
Максимальная приватность и без цензуры. Локальные модели картинок не требуют «мега-железа» и по качеству не уступают API (текстовый ИИ держит в голове весь сюжет, а модель картинок просто пишет один холст слоями — оттого ей нужно меньше памяти). Stable Diffusion/koboldcpp уже в сборке — или настрой ComfyUI отдельно. Модели (*.safetensors, *.gguf) клади в resources/stablediff/models, LoRA — в resources/stablediff/lora. Искать удобнее всего на civitai.
Maximum privacy, no censorship. Local image models don’t need mega-hardware and match API quality (a text AI keeps the whole plot in its head, while an image model just paints one canvas in layers — so it needs less memory). Stable Diffusion/koboldcpp is bundled — or set up ComfyUI separately. Drop models (*.safetensors, *.gguf) into resources/stablediff/models, LoRAs into resources/stablediff/lora. The easiest place to find them is civitai.
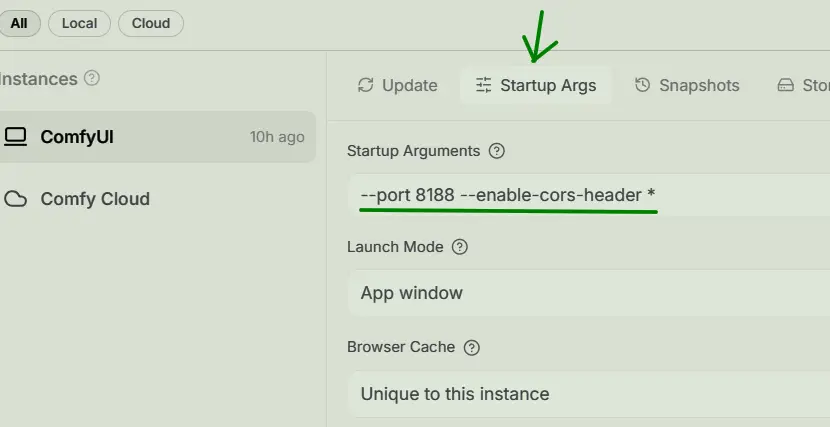
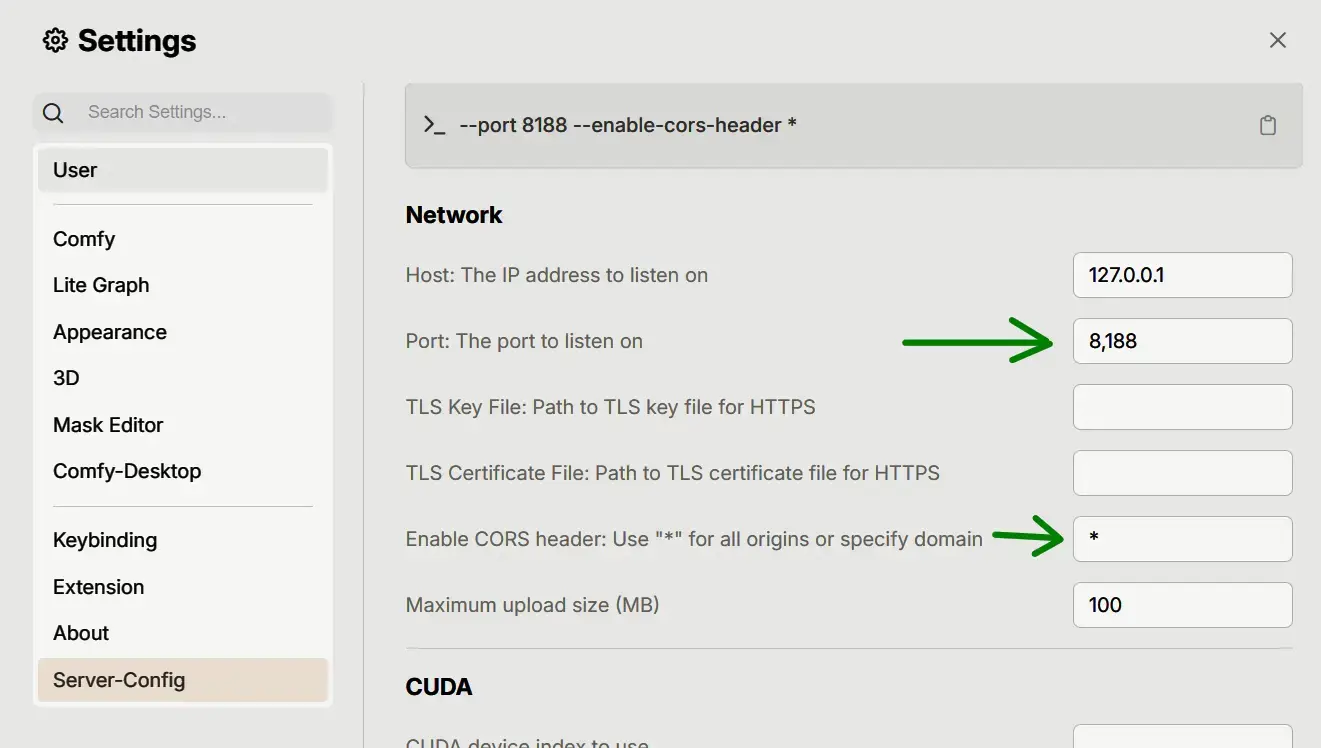
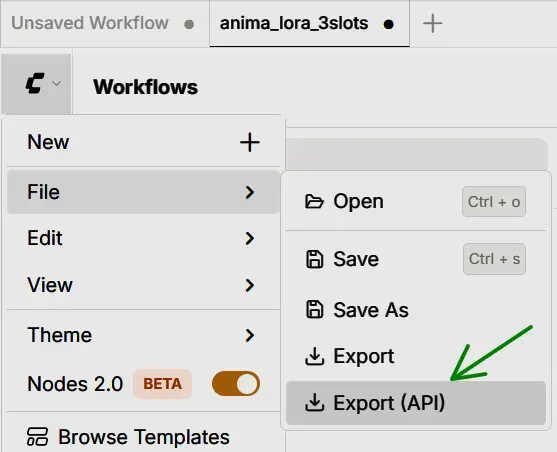
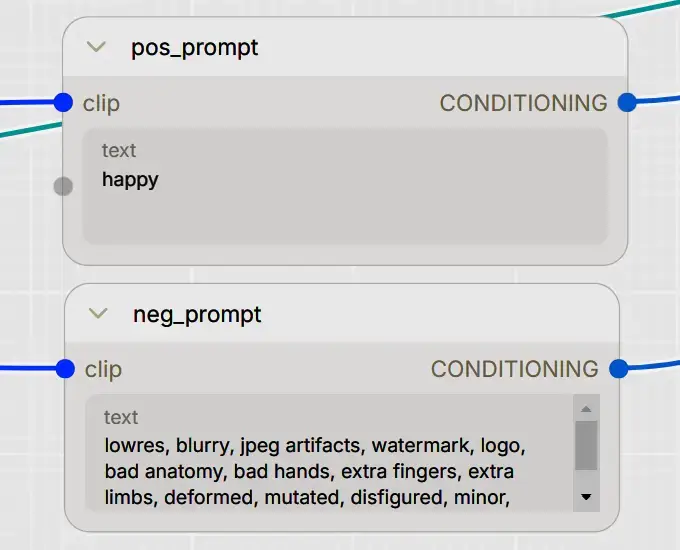
ComfyUI: в настройках ComfyUI впиши --port 8188 --enable-cors-header *. Чтобы твой workflow работал в игре, переименуй поля промптов в pos_prompt и neg_prompt → сохрани json через File → Export (API) и выбери его в настройках игры. Примеры workflow лежат в resources/comfyui.
ComfyUI: in ComfyUI settings paste --port 8188 --enable-cors-header *. For your workflow to work in the game, rename the prompt fields to pos_prompt and neg_prompt → save the json via File → Export (API) and select it in the game settings. Example workflows are in resources/comfyui.

✨ Anima в ComfyUIin ComfyUI
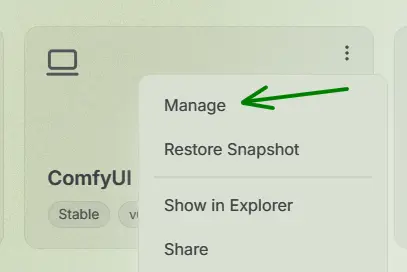
Запусти ComfyUI → перетащи файл workflow .json прямо в окно ComfyUI → скачай и разложи файлы по папкам:
Launch ComfyUI → drag the workflow .json straight into the ComfyUI window → download and place the files into the right folders:
- anima-base-v1.0.safetensors → ComfyUI/models/diffusion_models/
- qwen_3_06b_base.safetensors → ComfyUI/models/text_encoders/
- qwen_image_vae.safetensors → ComfyUI/models/vae/
- anima-turbo-lora-v0.2.safetensors → ComfyUI/models/loras/
Рекомендуемые настройки Anima: с turbo-lora — steps 8–12, cfg-scale 1, сила LoRA ~0.7; без turbo-lora — steps 20–30, cfg-scale ~6. Те же значения подходят при запуске Anima через koboldcpp. clip-skip на Anima не влияет. Recommended Anima settings: with turbo-lora — steps 8–12, cfg-scale 1, LoRA strength ~0.7; without turbo-lora — steps 20–30, cfg-scale ~6. The same values apply when running Anima via koboldcpp. clip-skip has no effect on Anima.
⚙️ Параметры генерации⚙️ Generation parameters
🎬 Видео (Wan)🎬 Video (Wan)
Поставь слайдер «кадры» больше 1 — и генерация станет коротким видео (анимированный gif, ~16fps, 81 кадр ≈ 5 сек). Работает только с видео-моделями Wan / LTX через koboldcpp; SDXL и Anima кадры игнорируют. Лёгкий комплект для 8 ГБ VRAM: Set the “frames” slider above 1 and generation becomes a short video (animated gif, ~16fps, 81 frames ≈ 5 sec). Works only with Wan / LTX video models via koboldcpp; SDXL and Anima ignore frames. Light kit for 8 GB VRAM:
- Wan2.1-T2V-1.3B-Q8_0.gguf [1.5gb] → resources/stablediff/models
- umt5-xxl-encoder-Q4_K_M.gguf [3.7gb] → t5-xxl
- wan_2.1_vae.safetensors [254mb] → vae
Модель → в список моделей, энкодер → поле t5-xxl, vae → поле vae, clip-1/clip-2 пустые. Не перепутай vae (для 1.3B — wan_2.1_vae). Первый запуск: кадры 5–13, 512×512, steps ~20, cfg-scale 5–6. Стиль — промптом или wan-лорами с civitai. Model → model list, encoder → t5-xxl field, vae → vae field, clip-1/clip-2 empty. Don’t mix up the vae (wan_2.1_vae for 1.3B). First run: frames 5–13, 512×512, steps ~20, cfg-scale 5–6. Style — via prompt or wan loras from civitai.
Озвучка и распознавание речиVoice & speech recognition
Реплики можно озвучивать (синтез речи), а отвечать персонажу — голосом (распознавание). И то и другое работает по API или локально. Lines can be voiced (speech synthesis), and you can answer the character by voice (recognition). Both work via API or locally.

🎙 qwen3-tts · coqui XTTS-2
Локальный синтез речи: qwen3-tts (включён в сборку win-local) или coqui XTTS-2. Активируй «локальный синтез речи» → выбери один из готовых голосов или клонируй свой — запись 6–15 сек в формате wav, положи файл в resources/speech и выбери в настройках. Чтобы модель не тратила время на запуск, используется локальный сервер — при первом старте брандмауэр Windows спросит разрешение.
Local speech synthesis: qwen3-tts (bundled in win-local) or coqui XTTS-2. Enable “local speech synthesis” → pick a preset voice or clone your own — a 6–15 sec wav clip, put the file into resources/speech and select it in settings. A local server keeps the model loaded, so on first launch the Windows firewall will ask for permission.
💡 Для качественного клонирования впиши текст, который произносится в записи, как можно точнее. Смена референсного wav может потребовать перезапуска игры. 💡 For good cloning, type the text spoken in the recording as accurately as possible. Switching the reference wav may require a game restart.
Распознавание речи: браузерное Speech API — самое простое и быстрое; из-за ограничений Google для оболочек electron оно открывается в браузере, так что держи вкладку открытой. Локальное (whisper ggml) — чуть качественнее, приватно и офлайн, но пока медленнее. У OpenAI рекомендуем включить кастомные инструкции к распознаванию в настройках. Speech recognition: the browser Speech API is simplest and fastest; because of Google’s restrictions for electron shells it opens in the browser, so keep the tab open. Local (whisper ggml) is a bit higher quality, private and offline, but slower for now. For OpenAI we recommend enabling its custom recognition instructions in settings.
Частые вопросыCommon questions
Игра платная?Is the game free?
Некоторые дополнительные настройки, кастомные контексты и режимы днд доступны по паролю (обновляется ~раз в месяц) - подписка на бусти или разовая покупка на itch The base version is free. Your support is what helps keep development going — thank you 🖤
Some extra settings, custom contexts, and DnD modes are available with a password (updated about once a month) — via a Boosty subscription or a one-time purchase on itch.io
Нужен ли интернет?Do I need internet?
В безопасности ли мои ключи?Are my keys safe?
Где хранятся мои сохранения и настройки?Where are my saves and settings stored?
multiic-save.json, который потом можно импортировать обратно. Windows:
обычно данные лежат в папке приложения:
%APPDATA%\Multiic\ macOS:
~/Library/Application Support/Multiic/ Linux:
~/.config/Multiic/ Saves, settings, history are stored locally on your device. The safest way to move them is to use the in-game save export. It creates a multiic-save.json file that can be imported later. Windows:
data is usually stored in the app data folder:
%APPDATA%\Multiic\ macOS:
~/Library/Application Support/Multiic/ Linux:
~/.config/Multiic/ Модель не отвечает / ошибкаThe model won’t respond / error
Локальная модель не запускаетсяThe local model won’t start
C:\multiic. Не используй Program Files, системные папки, OneDrive и папки с ограниченными правами. Проверь, что файлы модели не помечены как «только для чтения».Put the game and models into a simple writable folder, for example C:\multiic. Avoid Program Files, system folders, OneDrive, and folders with restricted permissions. Make sure model files are not marked as “read-only”.Я хочу использовать внешний KoboldCPPI want to use external KoboldCPP
http://localhost:5001.Start the game, disable the built-in KoboldCPP in the top-left corner, then launch your external KoboldCPP and set the endpoint, usually http://localhost:5001.KoboldCPP выбрал не ту видеокартуKoboldCPP picked the wrong GPU
Картинки выходят с цензуройImages come out censored
Stable Diffusion, ComfyUI и KoboldCPP — что выбрать для картинок?Stable Diffusion, ComfyUI, and KoboldCPP — which one should I use for images?
Где должны лежать модели для локальной генерации?Where should local generation models be placed?
Генерация картинок очень медленнаяImage generation is very slow
Остались вопросы?Still have questions?
пиши в Telegram или Discord — небольшое дружное комьюнити тебе поможет, стараюсь и сам часто отвечать. и спасибо всем, кто поддерживает проект 🖤 Reach out on Discord — a small, friendly community will help u, and I try to reply often myself too. And thanks to everyone who supports the project 🖤